The Electric Brewery
Sun December 25 2016 by Christopher AedoOne of my best friends (bones!) sent me an email asking if I'd ever heard of this thing called Hosehead (it's a control system for an electric brewery using open source software called Strangebrew Elsinore). I had never heard of it, but had been thinking on and off for some years about converting my brew setup to be all electric. I knew the efficiency was a big positive, plus the potential of being able to brew inside made the idea a lot more attractive (even if I don't have a good indoor spot to brew right now).
As could have been predicted, I started researching the concept and fell deep down that rabbit hole. A few hours later I was convinced converting my system to all electric was not just a sound idea, but the only rational choice I could make. I decided to put together a HERMS (Heat Exchanger Recirculating Mash System). By keeping the hot liquor tank at a temp just slightly above my target temp I could recirculate the mash and raise to, or hold at, any temp I wanted. Also recirculating the mash through the grain bed would lead to clearer wort and greater efficiency. Knowing all this I was sure only a fool would pass up the opportunity to build out a system like this!
I had started brewing 10 gallon all grain batches about two years ago using a large rectangular cooler for the mash and an 80qt stainless pot from Amazon. (That's an affiliate link by the way). I would heat the mash water to roughly 10 degrees over strike temp, siphon the water into the cooler, and then mash in. I had mixed results with efficiency, but the beers were generally decent. Still, the whole process was a bit of a hassle and I was eager to improve my system.
I set to work sorting out what I had and what I would need. For the controller I decided to use a RaspberryPi (first generation) that I had sitting around. The only use it got was an occasional MAME emulator so my boys could experience the joy of Super Mario World or Donkey Kong Country now and then. Making beer with it seemed like a better use, all things considered. Then I took an inventory of what I currently had so I could get my shopping list started. I already had one 20 gallon kettle I could use, and realized I could re-purpose my retired 13 gallon "keggle" as a hot liquor tank. That meant I would only need to purchase another kettle (for boil or mash), plus "a few" other odds and ends. Like a bunch of stainless valves, cam-lock connectors, hoses, 50' of 1/2" stainless steel tubing, two pumps, heating elements, wire, a project box, a 240v circuit somewhere, and a dozen other things I would come to find need for along the way.
On the controller front, there are easier ways to do it vs putting a RaspberryPi in charge, but I really loved the idea of being able to set it up to do a step-mash and know I could go do other stuff while the controller managed things for me. It will also make neat graphs of the temperature rise (and hold) through the process (even if those graphs are not really too valuable for anything). On top of that I'd always been on the lookout for something good to use the GPIO pins on the pi for and this seemed perfect.
Speaking of components, I've added links for most of the stuff I ordered, though it's not an exhaustive list. I'm trying to avoid making a complete list of every component I purchased for this project because then I'll see the whole cost in one place and I won't be able to trick myself into believing I did this on the cheap somehow.
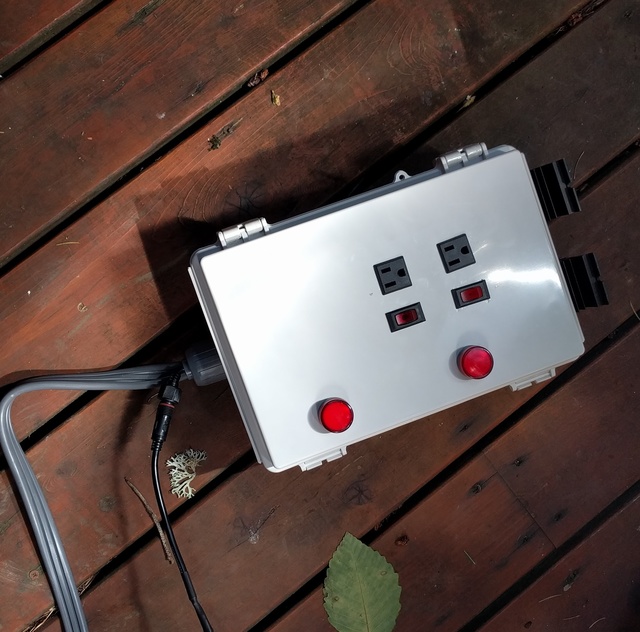
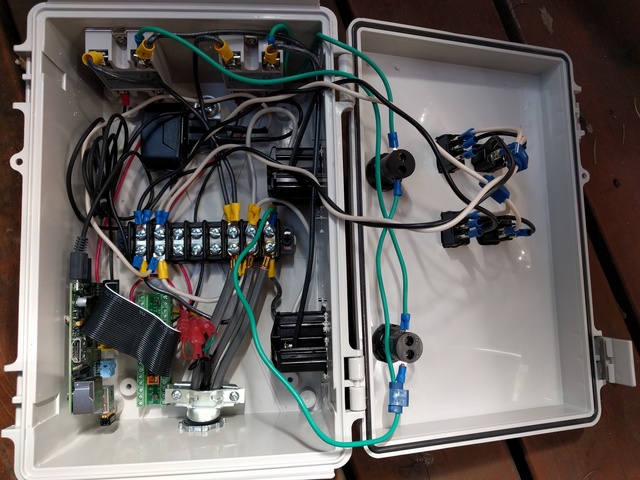
The first thing I started working on was the box to hold all the components. Because this would all be on a rolling cart I wanted it to be relatively portable rather than permanently mounted. If I had a spot (inside a garage, utility room or basement) I would have just used a larger electrical box mounted on the wall. Instead I found a decent size waterproof project box that I expected I could shoehorn everything into. In the end it turned out to be a little bit of a tight fit but it worked out. In the bottom left corner is the pi with a breakout board for connecting the GPIO to the onewire temperature probes and the solid state relays. To keep the 240v SSRs cool I cut holes in the case and stacked copper shims with CPU cooling grease between them and heat sinks mounted on the outside of the box. It worked out well and there haven't been any cooling issues inside the box. On the cover I put two switches for 120v outlets, plus two 240v LEDs to show which heating element was energized. I used dryer plugs and outlets for all connections so it's easy to disconnect a kettle from everything. Everything worked right on the first try too (making a wiring diagram first definitely pays off).
The next phase of the project involved drilling holes in my kettles for the heating elements and the valves. This took longer than it should have due to me starting with a dull drill bit. Eventually I wised up and got a new carbide tipped bit; combined with some oil and more pressure than usual it made quick work. I drilled 1/2" pilot holes and then used a titanium step bit to widen the holes from there as needed.
For heating I purchased these 5500w stainless 240v elements from Amazon. They've been working great, and the one in the boil kettle gets a pretty violent boil going, easily as vigorous as I used to get with gas and a big banjo burner.
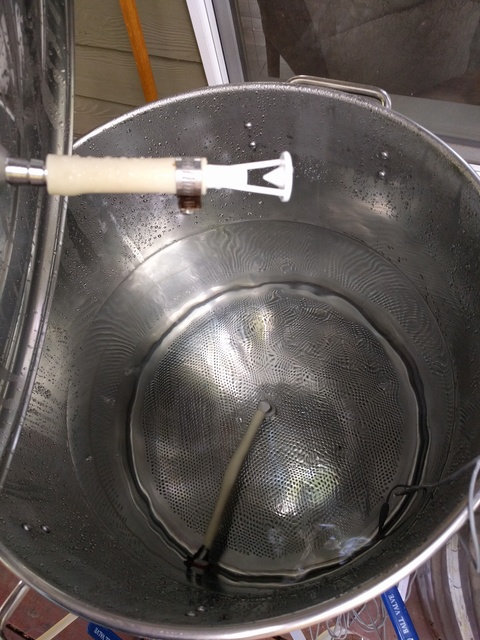
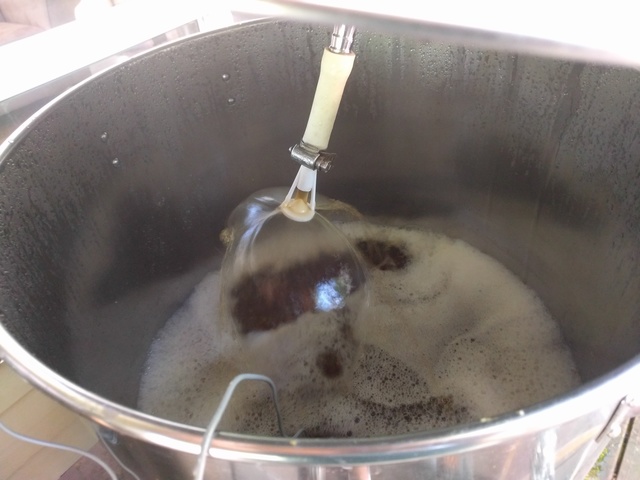
The mash tun was pretty easy, I would just need to find a decent false bottom. The Fermenter's Favorites Titan from Northern Brewer was a perfect fit for the kettles I had. It's really well made and nearly eliminates dead space. You'll see in the picture below that I'm recirculating the mash through a fly-sparge attachment. In theory I am at risk of introducing off flavors through hot-side aeration, but I haven't noticed anything yet.
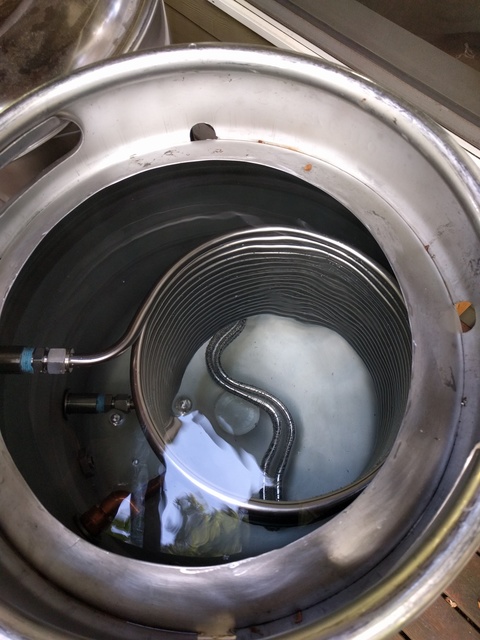
When it came time to add the stainless coil in the HLT I thought I'd be clever and thrifty by coiling the tubing myself. I purchased 50' of 1/2" stainless tube on Amazon and got to work trying to bend it up. I eventually made a coil but it was not pretty and it took WAY more effort than I anticipated. Along the way I kinked it up too much and basically turned out something that was unusable. I still have the tubing and expect I might use it some day for fixed runs in a more permanent brew setup. (I'm too ashamed to include a photo of that disaster...)
Seeing prices around $200 for a coil like this is what initially put me off from buying one pre-made. Then I stumbled across Stainless Brewing and was shocked to find I could get a perfectly coiled 50' run of stainless for almost the same price as the raw material. It happened to be my lucky day too as there was a 20% sale going on, so I immediately placed my order. It was a beautiful piece of work and installed easily.
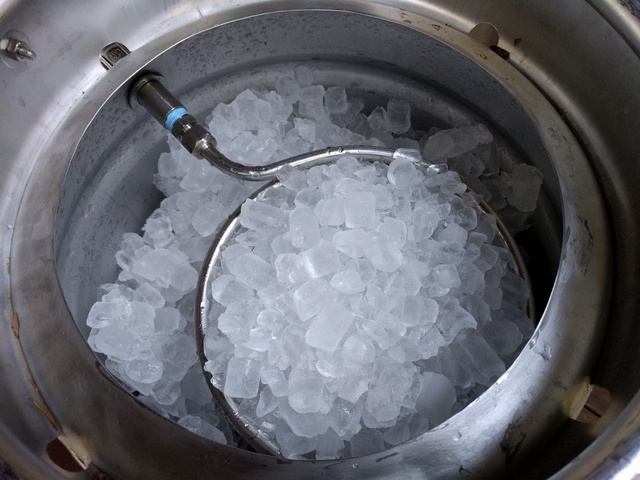
One other great side effect of having a setup like this is that when I'm ready to crash-cool the brew while transferring for fermentation I just pack the HLT with ice and water and keep that circulating while the brew is pumped out through the coil. This has worked awesome and I've been able to easily drop the temp to 70 at the end of the brew.
The last thing I needed were pumps, and again those are pretty expensive. I got lucky and found a Chugger SS center-inlet pump that had been returned to amazon and could be mine for $111! The second one was more expensive than that, but I knew I was going to need two pumps for this system. During mash I would need one to recirculate the wort through the stainless coil and back on top of the mash while a second pump recirculated the water in the HLT to keep that temperature steady. Then during mash out I would need one to pump the wort into the boil kettle while the other was pumping sparge water on top of the mash.
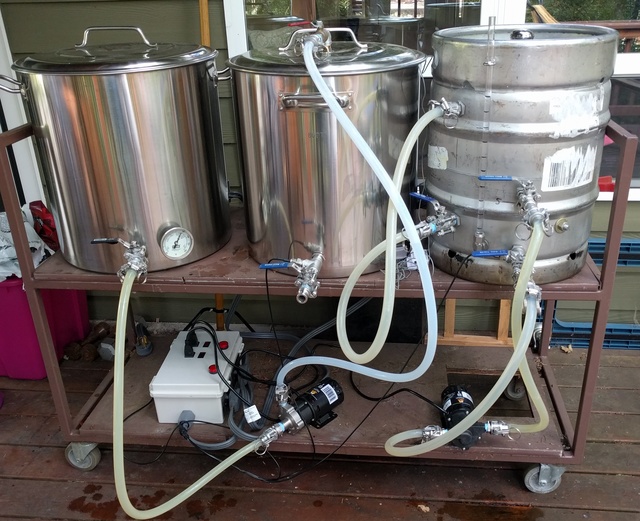
(Don't be confused by how the pumps and hoses are connected in this picture. I was moving cleaning solution from the boil kettle into the mash tun, and had been recirculating the water in the HLT. I'll include better pictures in my typical brewday post.)
For the hoses I used high temp clear silicon. I purchased the hose from the same place I got my stainless camlock fittings and the valves as well. Bargain Fittings seemed to have the best deals I could find for most of this stuff. I got bulkheads from them as well, along with a few miscellaneous fittings to get everything connected properly.
The only other thing I needed that was a little tricky to find was a compression fitting for the temperature probes. The probes were mounted in T fittings before the valve on the lowest bulkhead in both the HLT and the mash tun. As long as the liquid is flowing past the temp sensor, it's going to be accurate. I thought about adding a thermowell into the kettles as well but realized that's not going to be really useful to me based on my brewing process. Anyway, I purchased these 1/4" compression fittings from Brewers Hardware and they worked out perfectly.
I think that about covers everything I had to piece together to make this system. My next post will cover a typical brewday with this setup. Even from the first run, I was really happy with it. I've been hitting 85% to a touch over 90% efficiency with this, and the brews are ending up higher ABV than I intended. Once I get more used to this I'll be able to cut back on my grain bill a bit and still end up with good beer!
Helpful links: